
Using our new Images Tab feature:
Image Types
Beginning with version 4.2.1 released on December 31, 2012, the Images tab in the patient chart has been upgraded to allow our users to designate six image types, or categories, in order to group similar images together, thus making them easier to find among a large collection of various types of images. After you have designated your images as one of the various types you defined, you will be able to look at one or more of those groups, or types, without having all the other images intermingled with them. The way you designate which type or types of images you wish to see in the thumbnail listing is by selecting the checkbox(es) for the type(s) you want to see at the bottom of the images display area. Selecting a type causes TCE to filter the listing to include only images of that type. For example, you might have defined your image types to be Intra-oral, Extra-oral, x-rays, document scans, Pans, and Misc. If you have assigned one of these types to each of your saved images, and you selected the "Pans" checkbox, TCE will filter the images screen to only display panorexes you have saved.
The default behavior of the Images tab is to have none of the types checked, resulting in the listing of all the images regardless of type, including those with no type designated at all. That is how our Images tab has worked for years. Once in the Images tab, you may instantly filter the display by checking or unchecking the types as you wish, making it easy to find the images you want to see at the time.
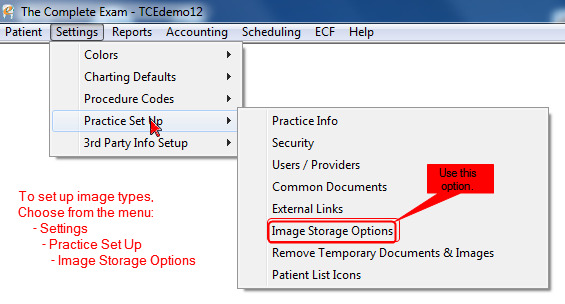
In order to initially set up your images types, from a menu bar in one of our screens, like the patient search screen, choose "Settings", then "Practice Set Up", and then "Image Storage Options" as shown below.
That will take you to the Image Storage options setup screen, shown below, where you can edit the type names to suit your needs. In the image below, the types have been named by our default set up. You may edit those names as you wish.
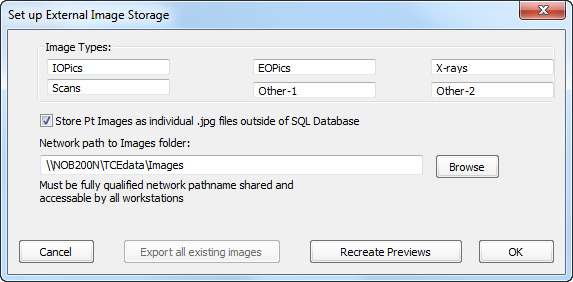
When you are finished making whatever changes you want to the screen, just click on the "OK" button to save your new setup.